Table of Contents
ToggleYour home alarm system is only as reliable as its backup power. When the main power goes out, whether from a storm, a downed line, or an outage, that 12 volt 7 amp battery is what keeps your system running and your home protected. Most homeowners never think about it until something goes wrong, and that’s exactly the problem. A 12V 7Ah battery isn’t just a backup: it’s a critical component that deserves proper selection, installation, and maintenance. This guide walks you through everything you need to know to choose, install, and maintain the right battery for your alarm system.
Key Takeaways
- A 12 volt 7 amp battery for alarm systems provides 8–12 hours of runtime during power outages, protecting your home when main power fails.
- Most alarm systems use sealed lead-acid AGM batteries, which are spill-proof and maintenance-free—verify your system’s chemistry type before replacement to avoid charging issues.
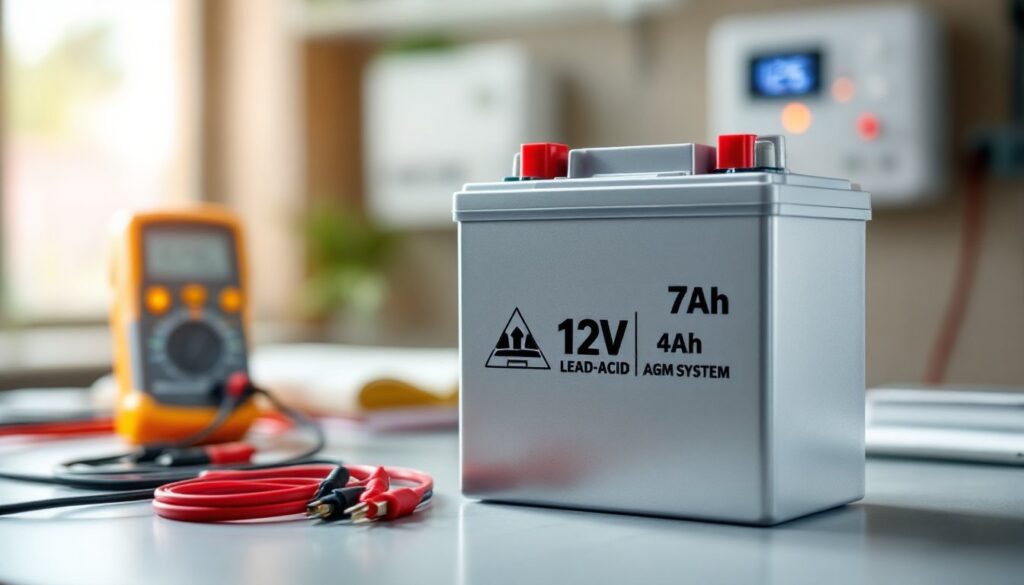
- Check terminal configuration (F1/F2 or M6), charging voltage (13.6–13.8V), and brand reputation when selecting a replacement battery to ensure reliability during emergencies.
- Replace your alarm battery every 3–5 years or when voltage drops below 12.4 volts, as preventive replacement every 4 years reduces the risk of unplanned failures.
- Proper installation requires disconnecting the negative terminal first, securing the battery in its tray, and testing voltage with a multimeter to confirm the connection is correct.
Understanding 12V 7Ah Battery Specifications
A 12V 7Ah (amp-hour) battery sounds like simple numbers, but they tell you exactly what you’re getting. The 12V part means nominal voltage, what you’d see on a voltmeter. The 7Ah rating means the battery can theoretically deliver 7 amps of current for 1 hour before being fully discharged, or 1 amp for 7 hours. This matters because your alarm system’s power draw varies: it might use 0.5 amps during standby, then spike to 2–3 amps when the system arms or a sensor triggers.
Most household alarm systems use sealed lead-acid (SLA) batteries, specifically absorbed glass mat (AGM) or gel types. These are spill-proof, maintenance-free, and don’t require ventilation like older flooded lead-acid batteries. If your system manual specifies a particular chemistry, stick with it, swapping an AGM for a gel type without checking can cause charging issues.
Undersizing the battery is a common mistake. A 4Ah or 5Ah battery might work on paper, but during a power outage lasting several hours, you’ll drain it faster than you’d expect. A 7Ah battery gives you a safety margin and longer runtime. Most installers recommend this capacity as the sweet spot for residential systems: it’s affordable, widely available, and handles typical outage durations without overkill.
Why Your Alarm System Needs a Backup Battery
Here’s the cold truth: a power outage doesn’t care about your alarm system. If the main power dies, your system goes silent without a battery backup. Most modern systems monitor whether they’ve lost mains power and will send an alert to your security company, but that doesn’t protect your home, it just reports a dead system.
Building codes in many jurisdictions now require battery backup for alarm systems, especially in commercial properties. Even in residential settings, insurers often ask about backup power when underwriting coverage. A system that can’t operate during an outage is technically unmonitored, which voids some policy benefits.
Beyond compliance, backup power buys time. If a burglar cuts your main power to disable alarms (a real technique), your battery gives you 8–12 hours of runtime to catch the breach before the battery depletes. Your system can transmit alerts to your monitoring center, contact authorities, or trigger a local siren, all on battery power. That’s not a luxury: it’s core functionality during the times you need it most.
Research from institutions studying security system effectiveness shows that monitored systems with backup power significantly lower insurance claims. The home alarm system battery is the linchpin, without it, you’re relying on luck that outages never happen.
Key Features to Look For in a Quality Alarm Battery
Not all 12V 7Ah batteries are created equal. When shopping, focus on these specifics:
Chemistry Type: Sealed lead-acid AGM batteries are the industry standard for alarm systems. They charge efficiently with your system’s built-in charger and hold voltage well under load. Gel batteries are also acceptable but less common: verify your system supports them before buying. Avoid lithium-ion batteries marketed as “upgrades”, most alarm systems aren’t designed to charge them safely.
Terminal Configuration: Your battery will have either F1/F2 terminals (fast-on spades) or M6 bolt terminals. F1 connectors are standard on residential systems: check your existing battery before assuming. Mixing terminal types means fabricating new cables or using adapters, which isn’t worth the headache.
Charging Voltage: A quality battery should charge at 13.6–13.8 volts (float charge) once fully charged. This prevents overcharging and extends cycle life. Cheap batteries often lack proper voltage regulation and fail prematurely. Your system’s charger should handle this automatically, but confirming the spec matters.
Build Quality & Brand: Manufacturers like Yuasa, CSB, and Enersys dominate the OEM (original equipment manufacturer) market for a reason, they’re reliable and widely available. Avoid no-name batteries from unverified sellers: you’re relying on this to work during a crisis.
Check your system’s manual or the label on your current battery for exact specifications. Many security companies sell proprietary batteries at markup: buying the equivalent non-branded version from an electronics supplier often costs 30–50% less.
Installation and Maintenance Tips
Installing a replacement battery is straightforward if you follow proper steps. Before touching anything, turn off power to your alarm system’s main panel. Many systems have a backup battery that keeps the panel live even if you cut AC power, so locate the main cutoff switch, usually a breaker or a power supply disconnect inside the panel enclosure.
Once power is off, note the polarity of the old battery: red wire to positive (+), black to negative (−). Disconnect the black (negative) terminal first, then red. This prevents accidental shorts. Remove any bracket or tray holding the battery in place, then lift it out carefully, even a discharged lead-acid battery weighs 5–7 pounds.
Slide the new battery into the tray, reconnect the red terminal first, then black. Tighten bolts or spades snugly but don’t over-torque: you’re just securing the connection, not applying maximum force. Power the system back on. Your panel may show a low-battery warning for a few hours while the charger brings the new battery to full capacity, that’s normal.
Common Mistakes to Avoid
Swapping terminals: Connecting positive to negative and vice versa will blow fuses or damage the charger circuit. If you’re unsure, take a photo of the old battery’s connection before disconnecting anything.
Ignoring compatibility: Forcing a battery with the wrong terminal type or chemistry into your system causes charging failures. Spend 2 minutes confirming specs against your manual.
Skipping the tray: Leaving a battery loose inside the panel allows vibration to damage terminals and create intermittent connection issues. Use the existing bracket: if it’s missing, buy a replacement from your system’s manufacturer.
Forgetting ventilation: Even sealed batteries generate small amounts of gas during heavy charging. Keep the panel’s ventilation holes clear and don’t block them with debris or tape.
Troubleshooting and Battery Replacement Signs
A dying battery sends predictable warning signs. If your alarm panel displays a low-battery warning light during normal operation (not during a power outage), the battery is losing capacity. Most sealed batteries last 3–5 years under typical charge-discharge cycles: if yours is approaching that age and showing warnings, replacement is due soon.
Test battery voltage with a multimeter set to DC voltage. A healthy 12V 7Ah battery should read 12.6–12.8 volts when the charger isn’t actively charging. If it’s below 12.4 volts during normal operation, the battery is sulfating (a chemical deterioration common in lead-acid batteries) and won’t hold a charge. No amount of trickle charging will fix this, replacement is your only option.
If your system loses power and the alarm goes silent immediately, the battery is completely dead or disconnected. Check that the terminals are tight and free of corrosion. Corrosion appears as white, blue, or green crusty deposits on terminals. If you see it, disconnect the battery, clean both terminals and cable ends with a wire brush, and reconnect. If the panel still shows low battery afterward, the battery itself has failed.
Some newer systems allow you to run a battery self-test through the keypad menu. Consult your manual for the procedure, it’s usually under “System Tests” or “Diagnostics.” This simulates a power loss and measures how long your system runs on battery alone. If the test fails or shows abnormally short runtime, the battery is degraded and should be replaced.
Research from smart home security experts at Tom’s Guide confirms that preventive battery replacement every 4 years, even if not yet showing warnings, reduces the risk of unplanned failures. Mark your calendar when you install a new battery so you don’t forget.
Conclusion
A 12 volt 7 amp battery isn’t glamorous, but it’s essential. Choosing the right one, verifying chemistry, terminals, and capacity, takes 10 minutes. Installing it takes 15 minutes. Checking it annually takes 5 minutes. Skipping any of this? That’s how you discover your system is powerless when you need it most. Follow the steps in this guide, buy a quality battery from a reputable source, and your alarm system will be ready for whatever outage or emergency comes next. Your home security depends on it.